Home Improvement NEW & REVOLUTIONARY PRODUCT
Improve your patio, driveway or swimming pool with Crystal Concrete Designs.
At Crystal Concrete, We have the product to meet all of your paving needs. The endless opportunities will appeal to your discerning taste. And the affordable nature of Crystal Concrete will present countless possibilities for decorating your home or business.
Crystal Concrete is not comparable to any other tiles or natural stones available on the US market today.
Crystal Concrete is a perfect paving solution for your driveway, patio, walkway, swimming pool and much, much more. Builders, do-it-yourself companies, building supply companies, landscapers, swimming pool installers, etc will find this product a remarkable product to offer to their customers.
Crystal Concrete has been designed in Europe with the latest technology and has to offer the following benefits:
Special Colors:
Because of their classic style and durable structure, Crystal Concrete patios, driveways and walkways will literally weather the test of time. The more the sun bakes into them, the more beautiful they become. So perfectly practical, the Crystal Concrete patios gives you ample opportunities for entertaining, relaxing and enjoying the outdoors.
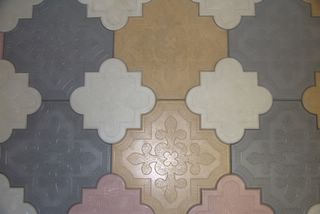
THERE ARE THREE DESIGNS AVAILABLE PLEASE CALL FOR MORE INFORMATION!
Only one design is shown in this article

______________________
CRYSTAL CONCRETE
1102 Technology Dr. Suite D
Indian Trail, NC 28079
http://eHomeImprovement.blogspot.com
Toll-free: (877) 326-8872
Phone: (704) 622-8727
Fax: (704) 847-3771
Email: crystalconcrete@yahoo.com
At Crystal Concrete, We have the product to meet all of your paving needs. The endless opportunities will appeal to your discerning taste. And the affordable nature of Crystal Concrete will present countless possibilities for decorating your home or business.
Crystal Concrete is not comparable to any other tiles or natural stones available on the US market today.
Crystal Concrete is a perfect paving solution for your driveway, patio, walkway, swimming pool and much, much more. Builders, do-it-yourself companies, building supply companies, landscapers, swimming pool installers, etc will find this product a remarkable product to offer to their customers.
Crystal Concrete has been designed in Europe with the latest technology and has to offer the following benefits:
- Less heat absorbent
- Non-Slippery surface
- Many colors to choose from
- Colors will not fade unevenly
- Multiple designs
- Up to 20000 lbs. Strength (installed on concrete and sealed (1 inch only))
- Custom colors can be made to fit your needs
- Virtually unbreakable
- NO WASTE
- Interlocking paving stones
Special Colors:
- Any color can be made per your request.98% Color mach guaranteed*
Because of their classic style and durable structure, Crystal Concrete patios, driveways and walkways will literally weather the test of time. The more the sun bakes into them, the more beautiful they become. So perfectly practical, the Crystal Concrete patios gives you ample opportunities for entertaining, relaxing and enjoying the outdoors.
THERE ARE THREE DESIGNS AVAILABLE PLEASE CALL FOR MORE INFORMATION!
Only one design is shown in this article
______________________
CRYSTAL CONCRETE
1102 Technology Dr. Suite D
Indian Trail, NC 28079
http://eHomeImprovement.blogspot.com
Toll-free: (877) 326-8872
Phone: (704) 622-8727
Fax: (704) 847-3771
Email: crystalconcrete@yahoo.com
posted by Arno at 7:48 AM
2 comments
![]()

